

Connect SMS to n8n
Integrate SMS with your AI workflow automation

N8N is a super powerful business automation and middleware platform.
You can set up triggers that fire SMS messages off to customers, staff or devices.
You can connect SMS to AI nodes and chat agents.
They have hundreds of templates ready to go.
-
Automate repetitive tasks.
-
fix outages automatically and alert staff of issues.
-
Monitor applications and devices.
Getting Started
To begin using SMS with N8N, first sign up for an SMS Everyone account. We will give you a free trial of 100 SMS credits that never expire.
Please mention that you are wanting to connect to N8N software.
We will contact you by email you to give you all of the settings to enter into your n8n software.
Once you have your SMS Everyone account up and running, you'll need:
Your SMS Everyone username
We will send this to you when you sign up.
Your password
We will send this to you.
The Origin of your messages
In Australia this can be a word up to 11 characters. eg 'XYZ ALERT'
Or we can make it a mobile number of ours so that when anyone in the team replies, it can forward that message back to everyone in the team.
Let us know how you want the service to work and we'll give you the Origin to put in to your N8N software.
In your n8n account...
Create a new workflow by clicking on the 'Create workflow' button (top right) or edit an existing workflow

In our example, we are going to connect SMS to Google Calendar.
On the top right of your workflow is a big + sign button. Click that button.

When you get the pop up asking 'What triggers this workflow?' type 'Calendar'
You'll see Google Calendar pop up as an option. Select it.
Then select 'On event created'

Now you have some parameters to fill in.
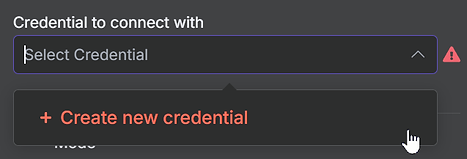
Lets start with 'Credential to connect with'
Click in the drop down and select 'create new credential'
(Unless you've already connected your google account - in that case select that connected credential.)
Follow the prompts to sign in with Google until you get the 'Connection successful' response.

The next parameter is poll times - Here you set how frequently you want n8n to check Google for any new appointments. lets go with Every minute.
Under the 'Calendar' drop down, select your calendar. Like this:

Now click on the RED 'Fetch Test Event' button on the left

You'll see some output on the top right hand side that n8n creates for you. The one we have here says 'hair appointment.'
As long as there is at least one item of test data, click 'back to canvas' (top left)
To the right of the Google Calendar Trigger is a + sign.
Click this to add your next action.

In the search bar, type 'http' and select the 'HTTP Request' action.

Please enter the info below into the HTTP Request step.
-
Method = POST
-
Authentication = Generic Credential Type
-
Generic Auth Type = Basic Auth
Basic Auth Field:
Click in this field and select 'create new credential'
Enter the SMS Everyone username and password exactly as we gave it to you. (Caps sensitive)
You can name this credential at the top left (so it doesn't just call it 'unnamed credential'

Click save and then X to close the credentials pop up.
The next parameters are:
-
Send Query Parameters = off
-
Send headers = off
-
Send Body = On
-
Body Content Type = JSON
-
Specify Body = Using JSON
JSON Field:
Paste this code into the JSON Box exactly as per below. This includes the {} brackets (we will change certain things at the next step.
{
"Message": "Hello, this is a test",
"Originator": "THE ORIGIN WE GAVE YOU",
"Destinations": [
"THE NUMBER/S YOU WANT TO SEND TO"
],
"Action": "create"
}
Now that you have pasted the code in, lets change the bits that need changing.
Message
You'll see that the first line of JSON code is the Message text. We have it as "Hello, this is a test" for now. Change it to whatever you like but be sure to keep the speech marks around the message. The speech marks must not be deleted.
eg "Message": "Alert - the XYZ hard drive is full",
Originator
Change the value of this field to the Origin/Sender ID that we gave you in the email. It must be exactly as we gave it to you. Don't delete the speech marks around it in the JSON. This example below has an origin of XYZ ALERT
eg "Originator": "XYZ ALERT",
Destinations
You can put one or more mobile phone numbers in here in international format without the + sign. For multiple numbers, separate with a comma.
eg "Destinations":[
"61400123456,61400987654"
],
Output from the Google Calendar Trigger
You can drag any field from the left side of the screen where the Google Calendar event's test data output is.
Drag it slowly to where you want it and you'll see your cursor moves around in the JSON box. Then it puts that variable in the box in green. Double check to make sure it has put it in the right place. It's a bit tricky and can accidentally drop it where you don't want it.
Click this little 'pop out' icon below to see the JSON box in full size. Plus it will show you the result using the test data if you add any variables to the message:

Here you'll see that we have the appointment start date/time and the appointment summary in the message body.
The originator is XYZ ALERT
The message is being sent to 61402123456


Once you have your JSON code all sorted, click 'execute app' (red button up the top)
You'll see a result on the right like this:

Code = Our response code. (0 means successful)
See HERE for all of the possible error codes.
CampaignId = our unique ID for the sms campaign you just sent.
Messages = The number of phones you sent the message to.
Segments = The number of segments in the message.
The limit of one segment is 160 characters, the limit of 2 is 306.
Credits = the number of credits used to send the message.
Once you have this part working, go 'Back to Canvas' (top left)
Then 'Save' (top right)
Then when you're ready to turn it on, change it from inactive to active.
That's it!
If you have any issues getting this set up, contact us
Click on FREE TRIAL below to get started.